With applications in both irrigation and landscape lighting systems, nearly every lighting and irrigation professional has experience installing, repairing or troubleshooting low-voltage wiring. Similarly, every contractor likely has a story about what they’ve uncovered when they’ve dug into the ground. From systems that aren’t waterproof to connections that weren’t designed to last in damp and acidic soil, missteps are sure to lead to a system failure down the line. These tips from lighting and irrigation professionals will help you navigate the issues you’re most likely to encounter when working with low-voltage wiring.
Not built to last
The old saying, “Don’t judge a book by its cover,” just doesn’t apply when it comes to irrigation and lighting systems. The light fixtures, connectors and other pieces of the system often provide many clues to the system’s staying power.
“You can judge a system based on the materials that were used,” says Sean Curran, owner of Beautification Through Illumination Inc., based in Amesbury, Massachusetts.
Oftentimes, new contractors or do-it-yourselfers will head to the big-box stores for materials. Many times, those materials aren’t the best ones for the job.
“The biggest thing I see is novice contractors using twist-on wire nuts, basically the kind you see at big-box stores,” says Brian Qualls, national business development manager for Unique Lighting Systems in Phoenix.
Those twist-on wire nuts are primarily designed for use with single-stranded wire, on which they’ll create threads on the end of the wire, making them difficult to remove. In the multistranded wire used with low-voltage landscape applications, a twist-on wire nut has nothing to grab onto.
“I’m just taking the wire and twisting it into a ball, which creates two problems,” Qualls says. “First, I can easily get the nut off with very little effort. I’m also creating a pinch point for electricity where it gets very hot. I’ve actually seen examples where the top of the wire nut melts because electricity isn’t flowing as smoothly as it should.”
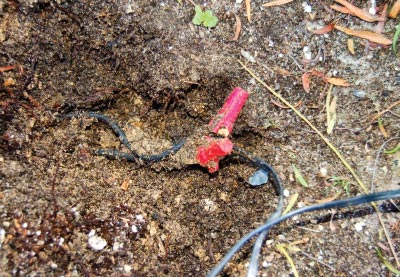
Quick connects, two nickel prongs that are pierced to the side of the wire and clicked together with plastic snaps, are another common find on a DIY project.
“Quick connects are made of nickel. If they’re in acidic soil, they rot away and you have to chase down every connection for repair,” Curran says.
The best connection for low-voltage wiring is a mechanical connection. “With a mechanical connection, you clamp onto the wire with a brass barrel, then heat shrink over that with a torch,” Curran says. “Some people are also soldering their connections.”
Crimp connections are also a readily available and more professional option.
“You take the wires through a copper sleeve that slips over the top, and a special tool will then crimp the copper sleeve down and pull the wires together,” Qualls says.
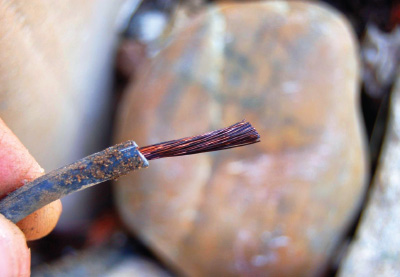
In addition to providing a subpar connection, twist-on wire nuts also lack waterproofing features, leaving systems vulnerable to the elements.
“When we do connections with lighting or irrigation where you are burying these in the ground, they are going to wick moisture,” Qualls says. “Once moisture is introduced into the wire, it will start to corrode the wire, and it works its way up the wire. Even if it is insulated, over time that wire becomes less efficient and won’t carry as much electricity.”
Check your work
Every contractor should have and know how to use a voltmeter. While LED lighting has made the margin of error wider than ever, it’s still possible to have too much or too little voltage running through a system.
 “I’ve seen some pretty wild things out there when people don’t check their voltage,” Qualls says. “A lot of contractors will wire a system up and never check to make sure it is properly volted. They just figure it is good and don’t check it.”
For LED lighting, the voltage range is between 10-15 volts. If you have less voltage, the lights will be too dim. If you go above 15 volts, you risk shorting the system. “I saw a guy fry 36 LEDs at the snap of a finger,” Qualls says. “We watched them blink and they were all dead. A lot of them aren’t very forgiving over 15 volts. You’ll short the LED and there will be no warning.”
While most transformers have a built-in failsafe, they are not all manufactured with that safety feature. The only way to ensure that you are wiring properly is to calculate amperage using Ohm’s Law, or total wattage divided by the volts on your tap.
“There are plenty of resources online as far as calculators and spreadsheets. Some manufacturers even have an app,” Qualls says. “It’s treated as a secret, but it’s not a secret. Everyone should know it.”
Once you’ve calculated your amperage for a system, Curran says that noting the amperage on the door of the transformer, or on an as-built plan, will help provide guidance when and if the time comes to add to or repair the system.
“We can match the amperages to know if there is a light out or a line that is cut,” Curran says. “If we see more amperage, maybe we know the customer has changed their own bulbs or the plan hasn’t been updated as more lights have been added.”
Leave the daisies for the flower beds
When an irrigation system fails, it typically fails at a fitting or elbow. When a lighting system fails, it typically fails at a connection point. Fewer connection points mean fewer potential spots for failure.
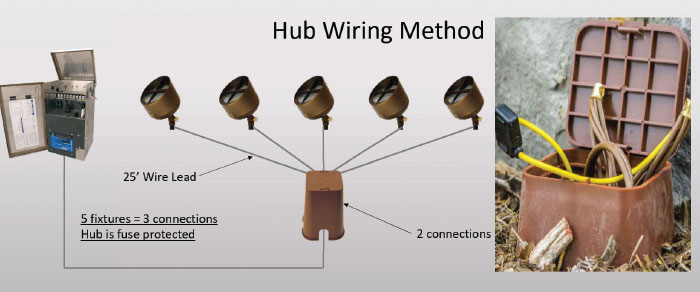
 “Many contractors will do a ‘daisy chain,’ where they are running one wire from the transformer to every fixture, snaking it through the landscape,” Qualls says. “That creates two connections at every fixture throughout the landscape. Those connections are the weak point of any system.”
A hub system, where each wire is pulled to one central transformer, eliminates connections and potential points of failure. It’s also easier to troubleshoot a hub system, as a contractor needs to locate one junction box rather than individual connections in the field.
In order to protect wires, Curran also recommends installing wiring so it follows hardscape. Running them along the sides of walls and foundations, rather than running them through planting beds, will give them the best chance of avoiding shovel points and other potential hazards. When it’s necessary to cross the landscape, Curran says that putting wiring in protective conduit, or placing wiring deep enough to avoid the reach of aeration machines, edgers and other machinery, will also help keep wires intact.
Reuse at your own risk
Compared to other components, wire is typically the least expensive part of any job. It’s also arguably the most important.
“Contractors want to use the wire that is already in the ground when they are retrofitting or redoing a system,” Qualls says. “They can’t lower the price of the fixture or the transformer, but wiring is one place they have wiggle room to offer savings to the homeowner. To me, that’s a huge mistake because they didn’t put the wire in the ground, so they don’t know what condition it’s in.”
Reusing wires while retrofitting a system effectively means that you’ve taken ownership of the wires, and any problem they may have in the future becomes your problem to repair.
“They are the ones to have to repair it, whether they installed it or not,” Qualls says. “It’s worth abandoning the existing wire and putting in new wire.”
There are instances where a contractor might notice that a system appears to have been wired with professional stranded wire and professional connections, Curran says. In that case, a contractor may choose to assume the risk of using existing wiring when adding to or retrofitting a system.
When choosing to install new wiring, Qualls says it’s OK to abandon old wire without removing it from the ground if it’s not in the way. If new wire crosses old wire at any point, it’s worth marking the wire, or removing it from that area, to avoid confusion down the line. But typically, it is easy to distinguish old, stiff, weathered wire from recently installed wire.
In the case of a new installation, Curran says it’s always best to access beds before walkways, patios or other hardscaping features are in place. That’s the ideal time for low-voltage wiring for both irrigation and lighting systems to be easily placed throughout the landscape.
 Be ready to reconnect
Despite every precaution, wires get nicked by shovels, cut by lawn equipment or chewed through by gophers and other rodents, and repairs are inevitable.
A butt splice will quickly and effectively reconnect wires. Though there are several on the market, Brian Qualls, national business development manager for Unique Lighting Systems in Phoenix, says he prefers the variety with a heat shrink component.
“There will be a piece extended to the butt splice that you can hit with a heat gun, lighter or blow torch,” he says. “When the material senses the heat, it shrinks down onto the wire to prevent any moisture from getting into the new connection.”
For lighting installers, Sean Curran, owner of Beautification Through Illumination Inc., based in Amesbury, Massachusetts, also recommends carrying a selection of drip irrigation connectors, 1-inch poly pipe connectors and clamps, so you have the tools on hand to complete your own repairs in the field.
“You don’t have to call in the irrigation company when you’ve cut pipe if you have some supplies,” Curran says. “In case you do puncture these lines, you can fix them.”